
How to Tie a Turban Scarf for Women — Intermediate Guide
Mastered the basics? This intermediate wrap creates a beautifully structured turban — no knots, no clips, held in place purely by the quality of the fabric and the snugness of your wrap. You’ll need a long crinkle cotton scarf of at least 80 x 200cm. Shop cotton scarves from £15 → — buy any 3 for £45.
New to turban tying? Start with our easy beginner guide →
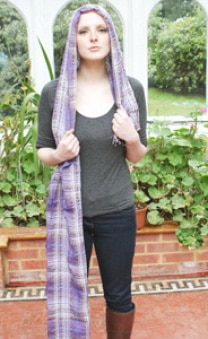
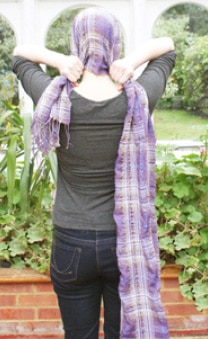
Step 1 & 2 - Position the Scarf Over Your Head
Take a long scarf (minimum of 80 x 200+cms) and open it out. The more tightly crinkled your scarf the better. Place over the top of your head with approx 20 cms hanging down on the wearer’s left and the rest of the scarf hanging on the right. You can fold the edge over nearest your face, it this makes it easier to start the wrap. Move the ‘ends’ behind your shoulders.
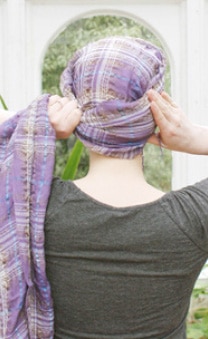
Step 3 - Wrap and Cover the Back of Your Head
Take the short end and draw it across the back of your head, ensuring you fold over the back of the scarf, fully covering the back of your head. You scrunch up the end or simply fold it over flat depending on how much volume/shape you want at the back of your head. Pick up the long right end and draw it over, continuing to tuck in so that the scarf feels nice and snug on your head at this stage. It is important to take a little time here, as this creates the fit of the head wrap. You can continue to tuck and fold until all ends are tidied away.
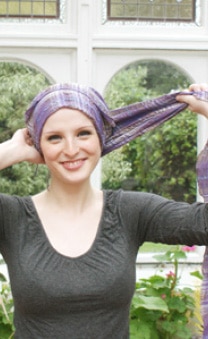
Step 4 - Bring the Scarf Around to the Front
Then wrap the scarf around your head, keeping it flat and opened out, you can see this in the picture taken of the front view of the head wrap at this stage.

Step 5 - Wind and Shape the Turban
Katia is shown slowly winding the scarf around her head, keeping the wrap tightest around the bottom of the scarf (nearest your face) and letting the fabric at the top of the scarf ‘flare’ slightly and stand up. This creates the fit of the turban, so take it slowly to ensure a snug comfortable fit.
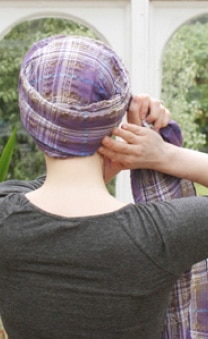
Step 6 - Check the Back and Layer Up
Shows the wrap from the back again and how the scarf is layering up.

Step 7 - Assess the Remaining Scarf
Shows how much scarf remains once wrapped properly round the head.
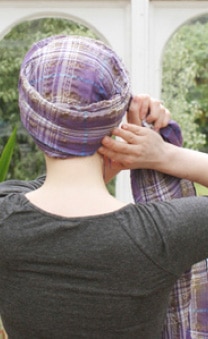
Step 8 - Tuck and Secure by Your Ear
all that remains is to tuck the end up under the wrapped scarf just behind your left ear (if you have a small head fitting, anything less than 56cms) or your right ear for larger head fittings using more of the scarf in the wrapping (anything up to about 59/60cms). Looking at the final view taken from the front, the scarf end adds a little flattering detail. You may well have to experiment here – too much scarf dangling and you’ll need to lengthen your short end and tuck in a little more at the back of your head at step 3. Not enough of a scarf end to dangle (for larger head fittings) take the short end as short as you can at step 3, using just enough to secure it at the back of your head.

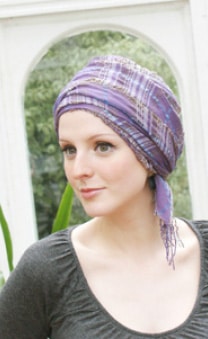
Final Look - Your Finished Turban Tie
Is simply to go back and tidy the ‘crown rim’ created by the scarf fabric. You’ll need to be quite confident in your head wrapping to wear this style ‘worry free’. There are no knots to secure; this style is held in place by the qualities of the cotton scarf (it is super lightweight and won’t slip) and the snugness of your wrapping. Be ready to razzle dazzle your friends… after a little practice!
Ready to give it a try?
Our long crinkle cotton scarves are designed specifically for turban tying — the textured fabric holds its shape, stays put all day, and won’t slip or unravel. Available in a range of dusky, skin-flattering colours. From £15 each — buy any 3 for £45.